

![]()
![]()
![]()
![]()
![]()
![]()
STEP BY STEP PAGE 3
|
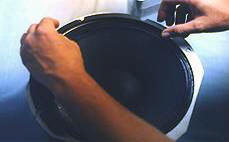
STEP #6 Bonding The Voice Coil Lead Wires To The Cone: |
We recommend that you use the black rubber toughened instant adhesive #GA-410. Pierce the cone with two small holes and pass the lead wires through. Press the lead wires to the cone and cover with a bead of the #GA-410 so they don't vibrate when the speaker is in use. Even though the #GA-410 is thick, you will want to position the speaker so that the surface you are putting the adhesive on is horizontal. Once you have covered the wires spray the Lightning Tack accelerator lightly on the outside of the cone and spray this as well. This will protect the cone from tearing under severe vibrations.
 |
 |
 |
|
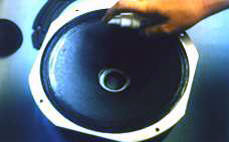
STEP #7 Bonding The Dust Cap To The Cone: |
Depending on the variety of cap and cone you are working on will determine which adhesive to use. If you are working with a paper or fiber cone to the same type of dust cap. We would recommend you use the #BC-32 Nitrile rubber cement. You can use the white poly vinyl acetate #WD-32 on these but because you can have high temperatures building up under the cap, you are better off with the #BC-32. On poly cones and caps you can use either the #BC-32 or the #GA-410 (Black Instant Adhesive) with the Poly Primer surface conditioner. Swab the area in the cone where the dust cap will rest and do the same to the flanged area of the dust cap. Then place a bead of adhesive on the flange and lightly press and hold this in position. Then run a small fillet bead of #GA-380 in the gap and spray it with Lightning Tack accelerator.
 |
 |
 |
|
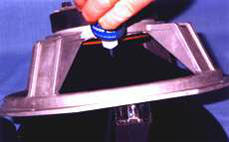
STEP #8 Bonding The Gasket To The Frame: |
Place the gasket pieces around the frame for hole positioning purposes. Then piece-by-piece pick up each piece and apply the #BC-32 Nitrile rubber adhesive onto the bottom of each gasket piece and lightly place it back onto the frame where you removed it from. When all pieces have been coated with the adhesive and aligned back on the frame, firmly press them into place. This will take about thirty minutes to fixture cure. If you would like to speed up the process you can tack the gasket sections after you completed the above process by applying a bead of either the clear #GA-422 or the black #GA-410 around the inside of the properly positioned gasket as a filet and spray with the Lightning Tack to immediately keep the gasket from shifting. You don't have to apply a complete bead, a small bead on at least two spots on each piece should do the job.
 |
 |
 |